Shush. They might have!
But as I was saying. This means that I am crocheting SNOWFLAKES! I’m also making some for random Christmas present-y type things. (What can I say? I have a lot of friends, and it’s a thoughtful gesture. And not fairly inexpensive!)
This also means that I currently have a LOT of new patterns that I’m developing, and they’re all so much easier than they look! All of my patterns, right now, are taking 2 rows.
Here’s the first pattern:
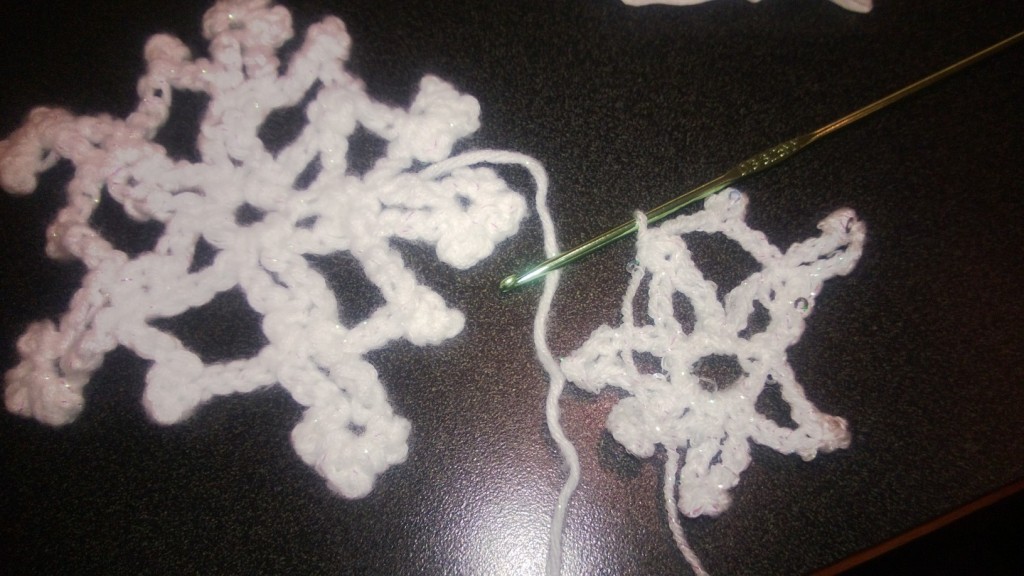
A finished one, and one that I’m working on
So, that’s sort of what they look like. The big one was a bit over 4 inches across. But I’m guessing you’re wanting to know how to make it, if you’re reading this far. So, here’s
Easy Snowflake Pattern 1
(Note: I’m assuming you already know how to crochet. If not, sorry! Also, this is probably the most complicated of the ones I’ve done… I’m not entirely sure why I decided to go with this one as the first pattern… Huh.)
1: Chain 7. Slip stitch together to form a loop.
2: This part is a bit trickier. Chain 4. Chain 4 more. Join at the 4th chain from the hook to form a smaller loop. (This is basically just a 4-stitch picot stitch, instead of a 3 stitch one.) Chain 3. *Single crochet in loop. Chain 3, chain 3 more to form a picot, chain 3. Repeat from * 4 more times. On the last time, slip stitch into the 2nd original chain. You should get 6 little “petal” type shapes. (Look at the smaller image for a reference, if you need it.)
3: Slip stitch in the first petal towards the first picot loop 3 times. (The point is to get to the first little loop without distorting the center crystalline structure) Then, *single crochet into the picot stitch, chain 3, do a 4-stitch picot stitch, then 2 3-stitch picots into the same loop.
(Look at the image if you need a reference. You’re going to end up with 3 little loopy things at the end of the snowflake. The bigger snowflake demonstrates this a lot better.)
Then, chain 3, single crochet into the first picot you single-crocheted in. This forms the “tall” part of your snowflake’s crystalline structure.
Now you’re going to bridge the gap between your first row’s “petals.” Here’s how: Chain 3, picot, chain 3 more.
Repeat from * until you get to where you started.
So just to recap, once you crochet to a picot stitch in your first row, you’re going to:
- Single crochet in the picot stitch.
- Chain 3.
- Create your set of 3 loops. (3 sets of chain-3 loops into a single chain.)
- Chain 3 more, single crochet into the original picot stitch from the first row.
- Chain 3
- Picot
- Chain 3, and suddenly you’re to the next picot in a “petal.”
When you get to the last one, slip stitch into the first single crochet you made in the second row. Fasten off. (I like leaving some tail so that the snowflake can be hung up.)
Happy crocheting!

