Category Archives: crafts and projects

Meet Syvad

Note: If this is your first time to TotalFluff, please visit this brief explanation. Thanks!

Hello, Fluffsters!

Today, I was able to again pick up a project I’d been working on off and on since Christmas: A miniature polymer clay dragon.

He’s about 3 inches tall, and his name is Syvad. He’d been sculpted over Christmas, and I just painted him.

blue, gold, and black dragon on a pile of treasure.

Isn’t he cute with his pile of gold?

He’s quite protective of his gold. And very recently received his colors.

small blue and gold dragon

This one shows the color a bit better

So, what do you think?

A very talented 4 year old

Note: If this is your first time to TotalFluff, please visit this brief explanation. Thanks!

Greetings, readers! I wish you a joyous Friday.

As your weekend approaches, I realize that some of you may be wondering what to do with your time. Well, fear not! A four year old and her mother have found a perfect solution. They design paper-dresses.

I wish that my family had been able to use such materials- that might have made the costuming easier for our shows. At the very least, it would have kept my younger sister out of trouble, or would have cost less.

You have a younger sister?

Yes. Furry McGiggles. Did I not mention her?

Uh, no… You didn’t. I knew about your younger brother, but you never mentioned a sister.

Oh.

Well, yes. Furry. She’s a lot younger than me, and very into clothing design.

You said something about it would have been less expensive…?

Yes. You see, she’s so into clothing, she would occasionally raid the costume wagon. Sometimes, when she was about three, she would simply wear the fanciest dresses through the mud, and ruin the hems.

She discovered sewing items, like scissors and pins, when she was two. When we were unlucky, she would decide to modify the dresses. After all, the acting troupe is a bit busy, and it’s really difficult to keep track of a small child.

…Oh. That does sound expensive.

It was. Your paper is much less expensive, from what I understand.

Well, I hope you have a wonderful weekend, readers!

Thing I Did When I Should Have Done Other Thing

Note: If this is your first time to TotalFluff, please visit this brief explanation. Thanks!

Hello, Fluffsters! Happy Monday!

So, this weekend I was both productive and not productive.

You know. I have something due on Friday, so that means that I cleaned my room (somewhat) and did craft projects instead. Yay procrastination!

I’m sure that I’ll get my Friday project done, so it’s not really that bad. But, yeah.

So here’s a picture of my craft project so far- a ceramic dragon pot thingy. (No, I’m not showing you my room. It’s better than it was, but it’s still not great.)

Front of a dragon pot

It’s a dragon!

A ceramic dragon with slightly stocky tail

So, the tail’s slightly dorky. As are the wings. It’s still cute!

The dragon's back becomes a lid

This gives a better view of the “lid”

So, yeah. It needs to be fired, of course. And then hopefully glazed. I’m trying to decide on colors. Do I want it to be glossy black? Glossy green? Not-glossy green? Something else?

Yeah. That’s my weekend, basically! How about you?

Dress Doodling Peeves

Note: If this is your first time to TotalFluff, please visit this brief explanation. Thanks!

Fluffsters, I have a problem.

Well, actually I have several. Maybe even more than several. (Nobody’s perfect- not even me!) But I’m only going to focus on one right now.

Ok. So, for as long as I’ve been able to hold a pencil (or a crayon, or a marker, or anything) I’ve been doodling dresses. I love dresses.

The big problem, though, is that I can’t get the anatomy for the human figure right. Seriously. It’s as though my fingers refuse to draw a decent, accurate female body shape.

So, this is a problem. If I don’t know if the body shape is at all accurate, I cannot tell if it would be worthwhile to try to figure out how to make my dress ideas come to life. And I don’t want to spend $20 or more on a failure. (I like big, fluffy skirts, too, so it would likely even cost more. A lot more. Just on the fabric. Not including time.)

So I don’t know what to do. Should I try to make prototypes of the dresses anyway? Stick to doodling? Try to work on more accurate human anatomy, even though it’s not nearly as much fun as dress-drawing?

If you have any thoughts, just leave a comment below!

Fun with Clay

Note: If this is your first time to TotalFluff, please visit this brief explanation. Thanks!

Hello, Fluffsters! Happy Wednesday!

Yesterday, I started something fairly new. I’m taking a ceramics class! So, that’s really fun. It also means that I’ll likely have a fair bit of content for this site because of that decision.

(After all, I expect much of my work to be fluff.)

So yesterday’s class was really fun. One of the activities the professor had us do was she gave us a word, and we were given a minute to pinch a ball of clay into something that symblified the words she gave us.

Here’s what I had:

Three clay figures symblifying anger, melodious, and strength

Three figures. Can you guess what the words were?

The words were anger, melodious, and strength.

The anger one should be fairly obvious. I might have added more, but I thought the simple was just as effective (and had more of a guarantee of working) as anything else I would have made.

Melodious is the one in the back. It’s supposed to symblify a flowing sound wave.

Strength was supposed to be a sanctuary, but it didn’t work out, especially in the time I had. So I went with my original idea: A cube. Cubes are some of the most solid, strong shapes. It’s hard to make a cube lose its balance, no matter which side it’s placed on. It’s, well, strong.

I’m fairly happy with how they turned out!

So, fluffsters, are there any fun things you’re learning in the new year?

DIY Teastained Decorations

Note: If this is your first time to TotalFluff, please visit this brief explanation. Thanks!

Hiya, Fluffsters!

I am very happy to be providing you with a tutorial today!

In case you hadn’t noticed, I kinda have a bit of a fantasy theme going with my room. And one of the major advantages of fantasy is that you can never have enough decorations!

You either have too few, or too many, but never “enough”?

Something like that.

But this means that when I have free time, I can work on more decorations for my room, and it works!

I’m not completely done with the current project yet. For starters, I haven’t quite figured out how I’m going to display the project yet. But I still like the way they’re turning out!

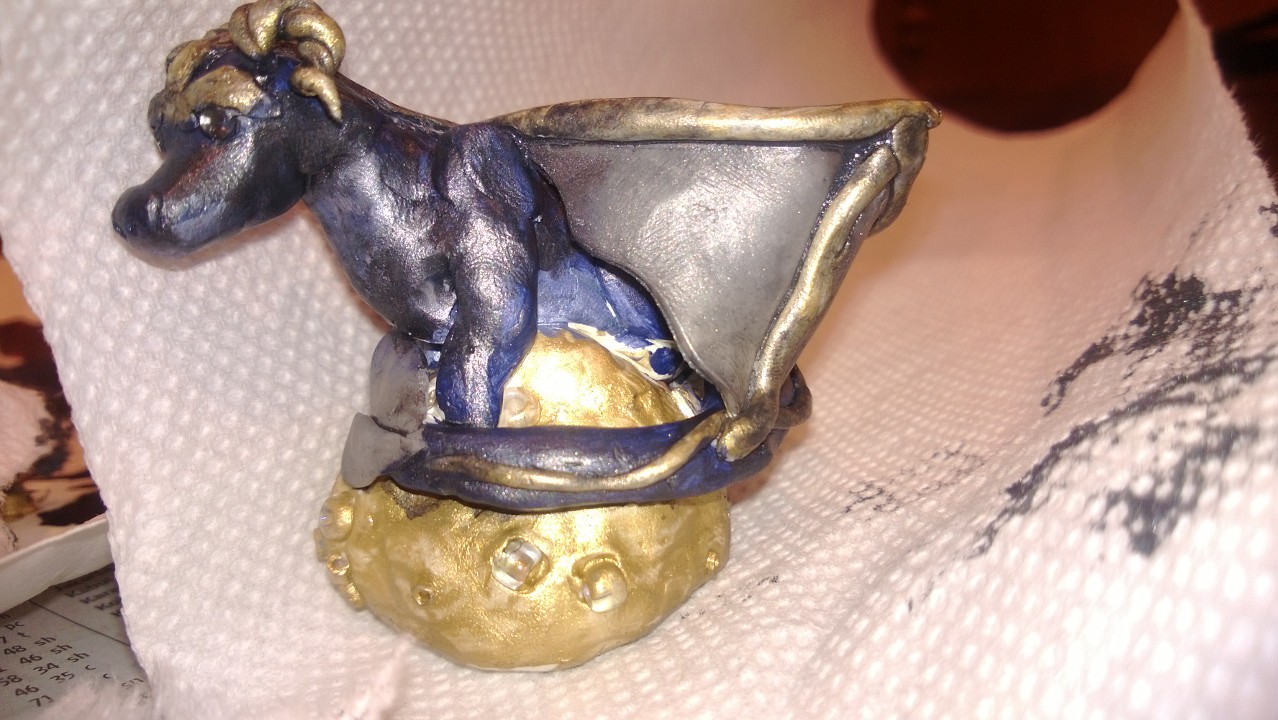
Here’s a picture of segments of part of them, to show you part of what the tutorial will work towards.

Three tea-stained doodles.

Three pieces from the new “Tea” collection… Or something.

So, here we go!

Teastained Dorm/Room Decoration tutorial

Supplies

To do this, you’ll need:

  • paper (Parchment paper looks pretty nifty.)
  • something to draw with
  • A cup for hot water
  • A tea bag. (I used Earl Grey.)
  • Hot water. (approximately 1-4 ounces.)

3 easy Steps

1) Cut or rip paper to appropriate size. I quartered my parchment paper. This gives you more to play with. Also, I don’t really like doing full-size paper thingies. So it works out for me. But make it whatever size you want. If you’re going to make a masterpiece you don’t want to lose any/much of, leave some space around the sides.

You’re going to rip the paper there towards the end of the process, so don’t worry about cutting paper perfectly or anything silly like that. You could rip it to look cool first, but I find it harder to draw on. So for laziness’s sake, I like drawing, and then ripping. (It looks more authentic, too.)

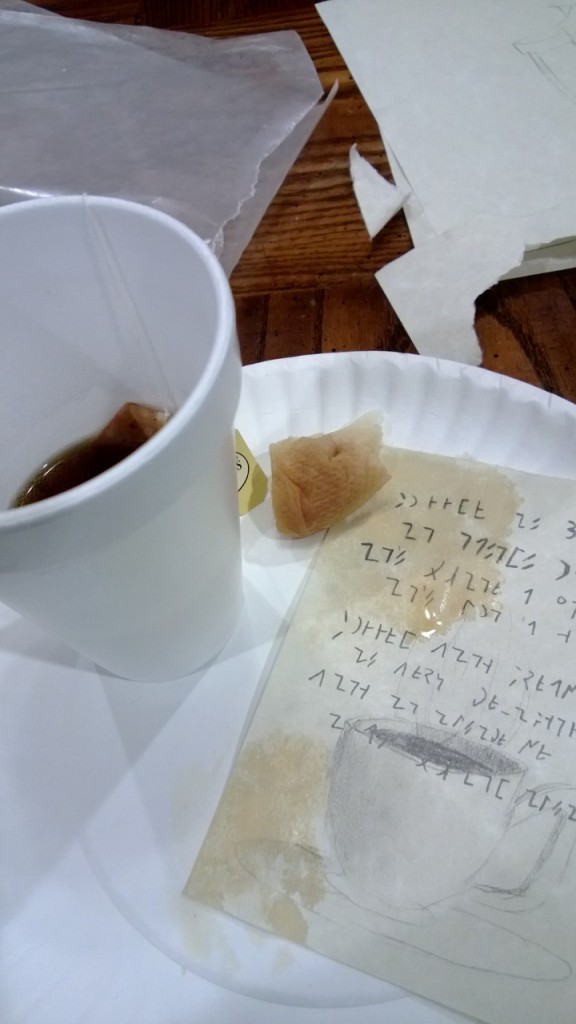
1b) Start your tea steeping. You should probably have done this before you start tearing your paper. You want really strong tea, to get a stronger color.

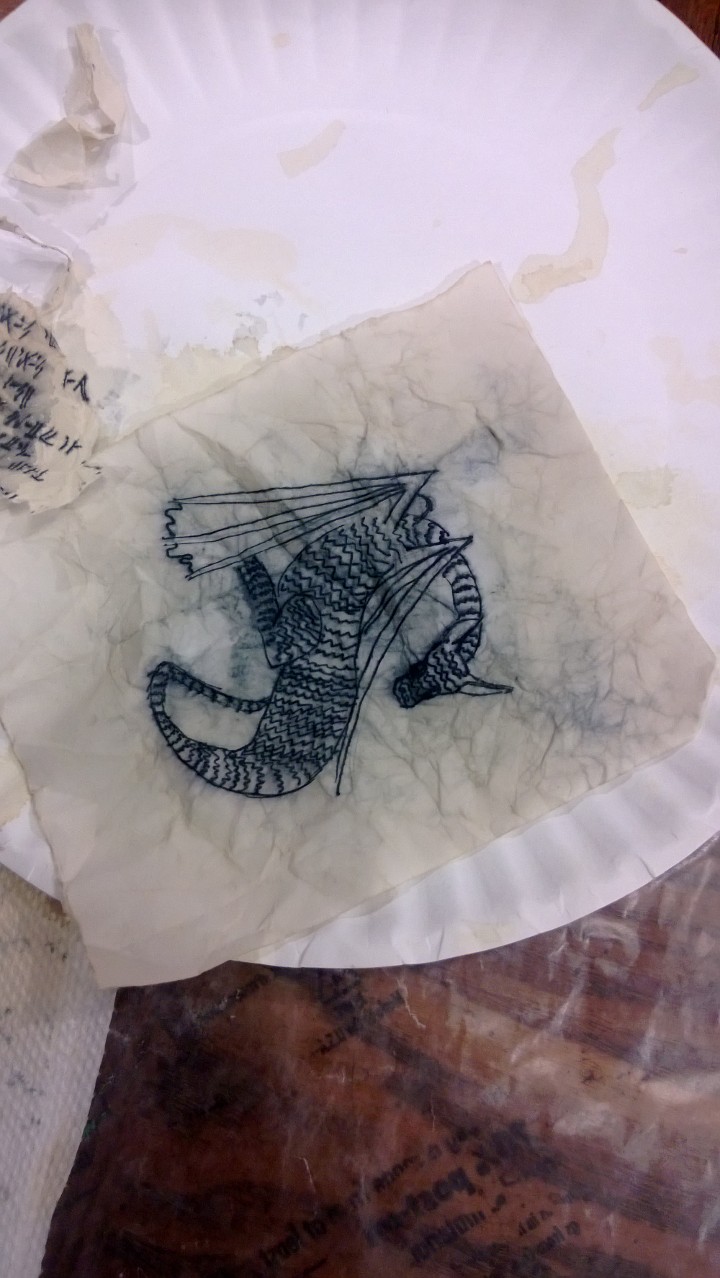
2) Draw your picture. Or write your poem, or set of proverbs. If you’re lacking inspiration, Fluffy did just share a set of… odd… proverbs and sayings. You can choose what type of medium to draw with. Pencil stays about the same. Ink runs, for a beautifully smudgy effect. (See picture below.)

3) Distress your paper. There are several ways to do this, all of which are variations on “Crumple, uncrumple, wet with oversteeped tea, and tear.” The steps can be rearranged, to different effects.

If you tear before you get the paper wet, the edges look a little rougher. If you get it wet and then start to tear, you have a lot more control over the torn edges.

Crumpling and then submerging the ball in the cup of tea also gives a cool effect.

A smudgy ink tea-stained dragon.

Ink also gives a fun effect! This is “normal” (non-parchment) paper.

This was one that I submerged as a paper-ball. It’s also one that I used ink on. I love how the ink ran into the creases! I haven’t torn this one yet, but I’ll be doing that after it dries. (I want the rougher edge look.)

Distressing your paper without submersion. This can be done in a variety of ways, for a variety of effects.

1) Painted on / sloshed / sponged.

distressed paper with a sketched mug and poem.

Sloshed / sponged / painted tea stain effect.

I used a paper towel to sponge the color on at this point. I then used another paper towel to blot it. Clearly, this is one where I crumpled and tore it after putting tea on it.

You can see the final version of this one peaking its head out in the first picture I shared. (I clearly later added more tea, and ripping effects.)

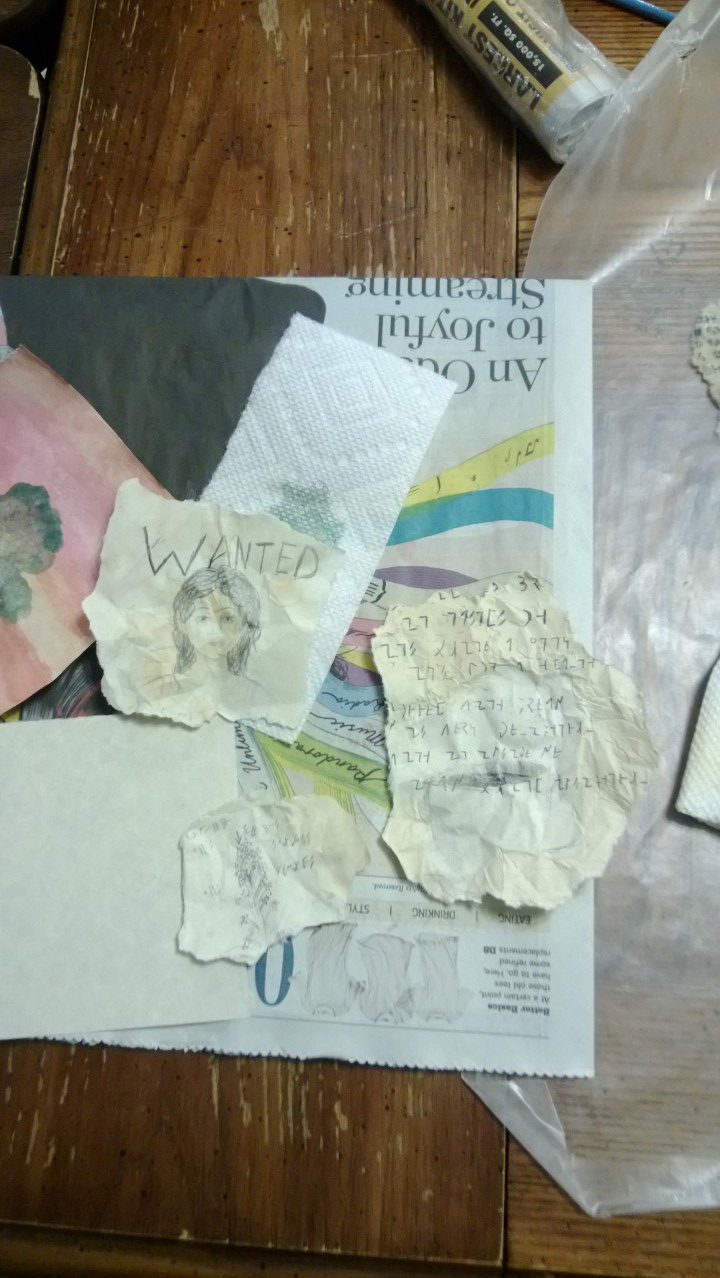
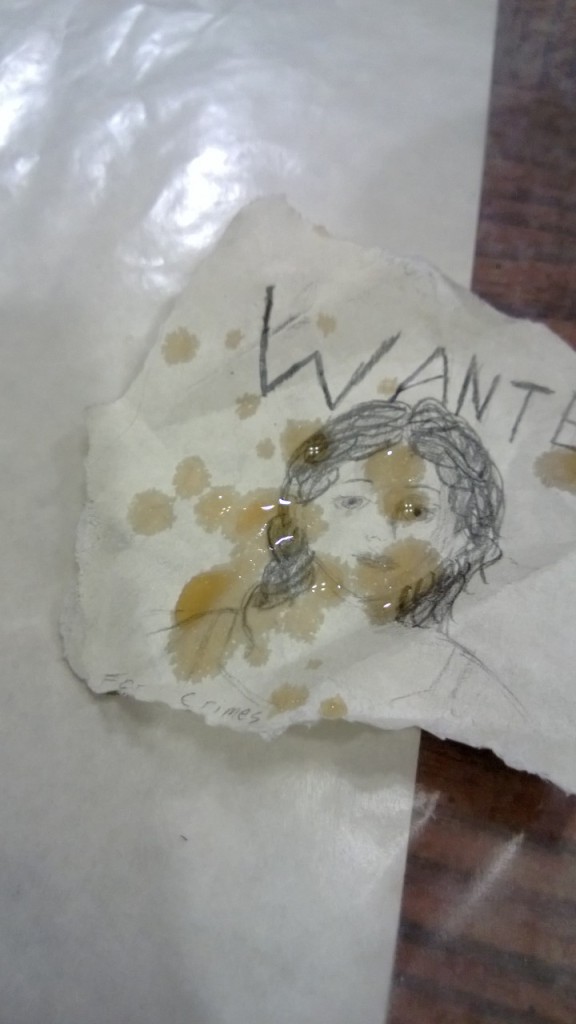
Spotting / spatter / drip

This is also easy. I took the teabag out of the cup, and bounced it on top of the picture. My story for the picture I did this of is that someone has fond memories of a convict, and therefore has the “wanted” poster snippet nearby. Whoever was keeping the poster will be quite peeved when s/he discovers somebody splashed some tea on it.

A splashed "wanted poster" of parchment paper.

Inspired by Once Upon a Time’s Snow. I know, it’s not obvious. But I tried…

As you can see, the pencil stays clear throughout the entire process. Well, as much as pencil ever does. The spotted coloration here is much more subtle than the complete submersion. Or painted effects. But it’s still fun.

And then, because I’m pleased with how it turned out, here’s a picture of another submerged Ink one.

An old-looking piece of parchment with a weird alphabet on it.

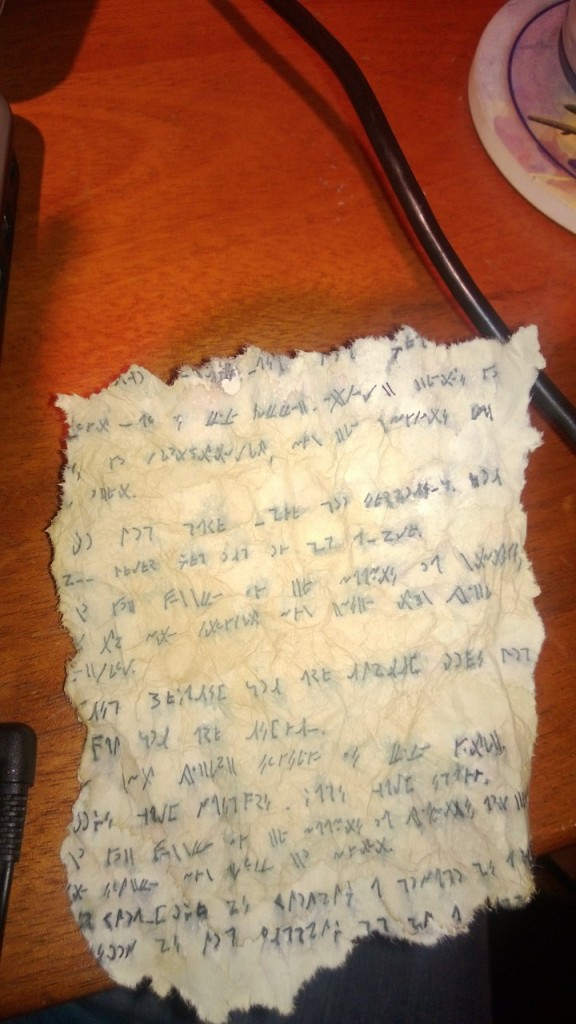
I wonder what ancient civilization’s poetry I found? 🙂

After it dried (somewhat) the first time, I put more tea on the center. That adds a vari-colored effect. But doesn’t that look positively ancient? Or at least, older than 36 hours old?

Well, have fun! I found this a great way to entertain myself.

I think my next set of tea-stained “poetry” will be monologues from “William Shakespeare’s Star Wars.” The poetry within deserves a display like that! And I truly mean that in the best way possible!

So, Fluffsters, do you have any recommendations for how I display this?

Tis the season… for crafts! (Phoenix Edition)

Note: If this is your first time to TotalFluff, please visit this brief explanation. Thanks!

Hello, Fluffsters! Merry Christmas Eve!

One of my favorite things about holiday time is that I actually have time to craft! It’s wonderful.

Tonight, for the first time since summer, I actually had time to get my clay out and play with it!

I’m really pleased with the result so far.

Here’s what it looked like coming out of the oven:

a partially base-painted clay phoenix pin

Unpainted. Sort of. Well, just a base coat for part of it.

As you can tell, I decided to paint the pin. In shape it looks a bit peacockish, but I really wanted it to be a phoenix. That calls for colors and stuffs. So to start with, I put a light base coat of gold over the entire thing. (I put a much heavier coat on the circle part, since I do want that to be pure gold.)

Next (not shown) I mixed together some tan and gold, and sued that for a stronger base for the bird’s body.

After that I realized that the only “red” I had (which is sort of necessary for phoenix colors) was actually a bit more… pink. So I ended up mixing it with black and a bit of gold, for a very nice effect, if I do say so myself.

I then used that to cover (most of) the rest of the phoenix. Finally, I added some more watery sloshes of the gold, a hint of white in various places, a bit more of the red, and on.

Here’s the result for right now:

A clay phoenix pin painted red and gold.

Painted! Yay! Isn’t the “red” nice looking?

I’m going to need to do a quick test before confirming what I’m going to do, but I’m thinking about putting some glow-in-the-dark paint on it. After all, it’s a fire-bird. It should glow, right?

I’d actually appreciate suggestions from you. Glow-in-the-dark paint? No? Eye? If so, what color should the eye be? (Blue, gold, silver, and white are all options.) In theory, I might be able to attach a crystal eye. The color options there would be “clear” (/white) or blue.If s/he does get a painted eye, should it glow?

Also, is it male or female? Does it have a name?

Please leave a comment!

Happy Tuesday!

Tying Shawls for Dancing

Note: If this is your first time to TotalFluff, please visit this brief explanation. Thanks!

Greetings, Fluffsters!

So, a couple days ago, before I went to the restaurant with my friends, we were at a Christmas themed ballroom dance. It was a lot of fun.

Right now, I’m just wanting to bubble about a discovery I made! But first, a little back-story. I’ve gone to this dance for the past several years. A couple of years ago, I had intended to go in a blue dress with a white shawl I made. (As in, I made both the dress and the shawl.) I went, but needed to take off the shawl since I wasn’t able to figure out how to keep the shawl (alright, it’s turned into more of a capelet) on without choking me or hitting whoever I was dancing with in the face. (Or chest, depending on the height of whoever I was dancing with.) So I despaired of being able to wear the outfit again.

You see, the dress is lightweight, but winter-blue. It does not work as a summer dress, since it’s very dark winter blue. But it also does not work as a winter-dress, because it’s a lightweight, sleeveless, knee-length dress. It looks very nice with the shawl, so I probably could get away with wearing it wintertime in warmer climates, but if there’s snow, it’s a bit cold.

It’s perfect for winter dances, though, since it’s very wintery, but it’s also cool enough that I don’t overheat in it, even after some really fast dances. The trouble is that it really doesn’t look very good without the white shawl.

All that to say, as of two years ago I thought I would never have the opportunity to wear that outfit again. But then I saw a post on one of my favorite blogs about something completely different, (a young girl getting a super-hero costume) but it still solved my problem. Included in the EPBOT post was a link to somewhere that showed a different way of tying cloaks, capes, and other things with stringy-things that normally get tied around necks with two pieces. (Not neck-ties. These are things that an average girl might encounter.)

Basically, you take the two ends of the tie-parts. Instead of tying them around your neck, pull them under your arms, and tie it behind your back. To make it a bit tighter, I added a second tie. So I ended up double-tying my shawl behind my back, which made it a nice snug fit. It also looked pretty sharp! (I unfortunately don’t have any pictures here, but it worked.)

It stayed on the entire time, even with a couple polkas, some fairly fast waltzes, and a swing or two. It was really fun! And I’m so happy to be able to wear that outfit again!

Happy Monday!


Easy Snowflake Pattern 1

Note: If this is your first time to TotalFluff, please visit this brief explanation. Thanks!

Hello, Fluffsters! Happy Thursday!

There’s a winter dance that I’m going to on Saturday, and I’m going to be helping to DECORATE! What does this mean, you ask?

Actually… they didn’t.

Shush. They might have!

But as I was saying. This means that I am crocheting SNOWFLAKES! I’m also making some for random Christmas present-y type things. (What can I say? I have a lot of friends, and it’s a thoughtful gesture. And not fairly inexpensive!)

This also means that I currently have a LOT of new patterns that I’m developing, and they’re all so much easier than they look! All of my patterns, right now, are taking 2 rows.

Here’s the first pattern:

a finished snowflake, and a crocheted one in progress.

A finished one, and one that I’m working on

So, that’s sort of what they look like. The big one was a bit over 4 inches across. But I’m guessing you’re wanting to know how to make it, if you’re reading this far. So, here’s

Easy Snowflake Pattern 1

(Note: I’m assuming you already know how to crochet. If not, sorry! Also, this is probably the most complicated of the ones I’ve done… I’m not entirely sure why I decided to go with this one as the first pattern… Huh.)

1: Chain 7. Slip stitch together to form a loop.

2: This part is a bit trickier. Chain 4. Chain 4 more. Join at the 4th chain from the hook to form a smaller loop. (This is basically just a 4-stitch picot stitch, instead of a 3 stitch one.) Chain 3. *Single crochet in loop. Chain 3, chain 3 more to form a picot, chain 3. Repeat from * 4 more times. On the last time, slip stitch into the 2nd original chain. You should get 6 little “petal” type shapes. (Look at the smaller image for a reference, if you need it.)

3: Slip stitch in the first petal towards the first picot loop 3 times. (The point is to get to the first little loop without distorting the center crystalline structure) Then, *single crochet into the picot stitch, chain 3, do a 4-stitch picot stitch, then 2 3-stitch picots into the same loop.

(Look at the image if you need a reference. You’re going to end up with 3 little loopy things at the end of the snowflake. The bigger snowflake demonstrates this a lot better.)

Then, chain 3, single crochet into the first picot you single-crocheted in. This forms the “tall” part of your snowflake’s crystalline structure.

Now you’re going to bridge the gap between your first row’s “petals.” Here’s how: Chain 3, picot, chain 3 more.

Repeat from * until you get to where you started.

So just to recap, once you crochet to a picot stitch in your first row, you’re going to:

  • Single crochet in the picot stitch.
  • Chain 3.
  • Create your set of 3 loops. (3 sets of chain-3 loops into a single chain.)
  • Chain 3 more, single crochet into the original picot stitch from the first row.
  • Chain 3
  • Picot
  • Chain 3, and suddenly you’re to the next picot in a “petal.”

When you get to the last one, slip stitch into the first single crochet you made in the second row. Fasten off. (I like leaving some tail so that the snowflake can be hung up.)

Happy crocheting!

DIY Miniature Painted Banner Tutorial

Note: If this is your first time to TotalFluff, please visit this brief explanation. Thanks!

Hello, Fluffsters! Happy Wednesday!

As I mentioned yesterday, I’ve been a bit busy crafting. (It’s been fantastically fun.)

The first thing that I made yesterday was a painted miniature banner.

Gold painted sun on dark blue miniature banner.

I really liked the gold paint on the blue.

The really fun part about it? It’s glow in the dark! That means that the sun motif disappears in the dark, and the stars that I painted on come out. This is my first attempt at painting a banner, and I think it worked really well. (If I do say so myself!)

DIY Miniature Painted Banner Tutorial

Materials

To start with, find any spare piece of fabric. I personally used a dark blue satin that I had. (I made a dress out of the material about two years ago, and never got rid of the scraps. What can I say? They sometimes turn out to be useful!)

A length of blue satin fabric to make a banner

A small piece of fabric.

Also, get a needle and some sewing thread. I happened to find some that matched the fabric almost perfectly. I love it when that happens! At the end, you’ll also need some paint that works on Fabric. I used either Martha Stewart All Purpose Paint, or Folk Art Acrylic. (I don’t remember which- sorry!)

So, just to clarify, you’ll need

  • Fabric scrap (Any size works. It depends on how big you want your banner.)
  • Needle & Thread
  • Paints that work on fabric

Instructions

1) Cut a piece of fabric. I first trimmed it down to approximately a reasonable size. I think it was about 6×8 inches, but I’m not entirely sure. This is really flexible, though, and only depends on how large you want your banner to be. Whatever size you’re making it, don’t forget that you’re going to need to leave room for hemming. Unless you found a fabric that doesn’t fray, like I did with my red banner from yesterday. However, since this is for a sewn and painted banner, I’m going to assume the fabric frays.

That was a bit circuitous…

Oops. Sorry.

2) Shape the fabric. To get the banner shape, first fold the fabric in half length-wise / vertically. (Or “hotdog style” if that helps.) Next, from about 1/4 to 1/3 of the way up on the fold, cut towards the open edge corners. This gets the “splayed” banner effect. (If you want more of a shield shape, cut at an angle from the bottom of the fold up towards about 1/4 to 1/3 of the way up the fabric, at the edge side.)

cutting at an angle from the fold towards the bottom corners

Cutting the fabric into a banner shape.

It should look something like this when you’re done and unfold it:

a basic banner shape after cutting the fabric

unfolded splayed banner shape

Note: I didn’t iron this fabric before cutting. That was a mistake. Take the time and get the wrinkles out! It helps a lot with painting later on.

I also don’t show it here, but after this, I evened out the top edge slightly, even before stitching.

3) First pass with thread and needle. You don’t have to, but I found it easier to hem the non-angled bits. The way I did this was for each edge, I first did a simple hand stitch over a single fold of fabric. (This is more effective then pinning a hem in place.)

A single line of hand stitching holds a fold in place for easier hemming

Stitching only a single fold in.

As I’m sure you’re aware, fold towards the wrong side of the fabric, if you have fabric with a right / wrong side. Also, be sure to fold consistently towards one side. Nobody makes a banner to see the folded edges- that’s just silly.

4) Make it into a hem. What I personally did was I got one edge hemmed before moving onto the next edge. Looking back on it, it might make more sense to make a first pass on all the edges, and then convert them all to actual hems. If you try that, let me know how it works?

But anyway. For those who don’t know how to do that, basically just take your edge and fold it over (towards the same side) again. The point is to hide the unfinished edge so that it won’t fray. This is especially important with fabric like the type I was using that frays waaaay too quickly.

A partially hemmed edge. One part is only single-stitched- the other part is hemmed all the way.

An example of what the hemming will look like

As you hem, it should look something like the photo above.

Do this for all of your straight edges.

5) Deal carefully with your angled edges. To get them to work better, you’re going to want to make a slit up the middle of the banner. A small slit will do- this is just to allow you to hem each angle a little more easily, and still have a relatively tight corner there at the bottom. Then, repeat the steps that you did with the straighter edges. (You know. Fold once, stitch down, fold again, stitch again.)

Scissors cutting a slit in the fabric to let tighter corners be hemmed

Add the slit to your banner to allow for tighter corners.

6) Trim extra. When you’re done rolling / hemming the angled parts, you’re going to get a few awkward parts hanging off the end.

weirdly shaped corner part

Awkward corner.

Just trim that part, to make it even with the rest of that part of the banner.

even corner part

Trimmed corner part

7) You’re done with the stitching! Now, on to painting!

The fully stitched (unpainted) miniature banner.

Finished stitching! Paint, and you’re done!

As I mentioned, I just used craft paints of various sorts. I ended up freehanding everything. That’s primarily because I don’t own any decent stencils of any sort. Painting is completely up to you. The key thing to remember is to have fun! This is probably one of the cheapest crafts you can do, since in theory you’re only using leftover scraps. So yes, you’re paying for paint. But you don’t need that much for the motifs. In all, it’s fairly inexpensive.

As always, if you make one, please comment or send me a picture? My email is webmaster [at] totalfluff.com . (Clearly use the “@” instead of [at]. No spaces, either. Those are simply there to prevent spamminess, I hope.)

Happy Wednesday! And happy crafting!